Cathedral Window Using Blue Jean Fabric Cat Mat
I recently searched on several quilting forums to see some of the most challenging quilt patterns other quilters attempted.
One of the most mentioned patterns was cathedral window quilt patterns.
This search got me thinking, what's so tricky about this style of quilt making?
How do you quilt a cathedral window?
I know that looking at the cathedral quilt design can seem daunting, but I've figured out the steps to create this seemingly complicated construction.
This tutorial will show you how to make a cathedral window quilt and give you some tips and tricks I've discovered in my quilting adventures.
What Are Cathedral Window Quilts?
The cathedral window is a traditional quilt block that gained popularity in the US in the 1930s. The design is meant to look like the gorgeous stained glass windows you would see in historic churches — hence the name "Cathedral Window."
What makes this block so special is the construction using a folding technique reminiscent of origami. Later in the tutorial, I'll break down each fold for you so that it is an easy-to-follow process.
How Much Fabric Do You Need for a Cathedral Window Quilt?
The amount of fabric you need will depend on how large of a quilt you will be making. Here's the amount of fabric I use for my example in this tutorial.
For a finished mini quilt that measures 18 ½" square, you will need:
- 40" length white background (44" width)
- Cut 16- 10" squares
- 2 ½"x10 strips- 6 different fabrics
- Cut 4- 2 ½" squares from each fabric (24 squares total)
Tip : Cathedral quilting is a great stash buster project.
Do Cathedral Window Quilts Have Batting?
This is a common question when it comes to cathedral window quilts, and understandably so. Traditionally, quilts always have some sort of batting in between the quilt top and backing, but for this quilt style, because we fold all the raw edges inside the block, it doesn't need batting or a binding.
Supplies You Will Need to Make A Cathedral Quilt
- Cutting supplies: cutting mat, ruler, and rotary cutter
- Water-soluble ink pen
- Cardstock or thin cardboard
- Pins
- Ironing board (or wool mat if you have one) and iron
- Elmer's glue or some sort of craft adhesive
- Sewing machine and thread
Cathedral Window Quilt: A Step-by-Step Tutorial
With these steps and photos, the mystery and difficulty surrounding the cathedral window block should melt away. This tutorial will give you a finished mini quilt that you can use as a centerpiece, wall hanging, or the top for a pillow cover.
Step 1: Cut your squares.
From your background fabric, cut 16- 10" squares. For the "window" part of the design, you will need a total of 24- 2 ½" squares. I used six different fabrics, so I cut four squares from each fabric.
Step 2: Fold the raw edges.
Take the cardstock or thin cardboard and cut out a 9 ½" square. This square will be your template to fold and press the raw edges of your background fabric ¼" towards the center of the background square.
Center the template in the square, then fold and press all four edges of each square, and set aside.

Step 3: First set of folds.
If you have a wool pressing mat, it will help get these folds as crisp as possible. If you don't have a wool mat, that's okay.
You could use your regular ironing board and a pressing spray such as Best Press or another starch spray.
Mark the center point of the background square with your water-soluble ink pen.

Take one of the corners and place the point right on top of the center point mark. Press the fold you have created.
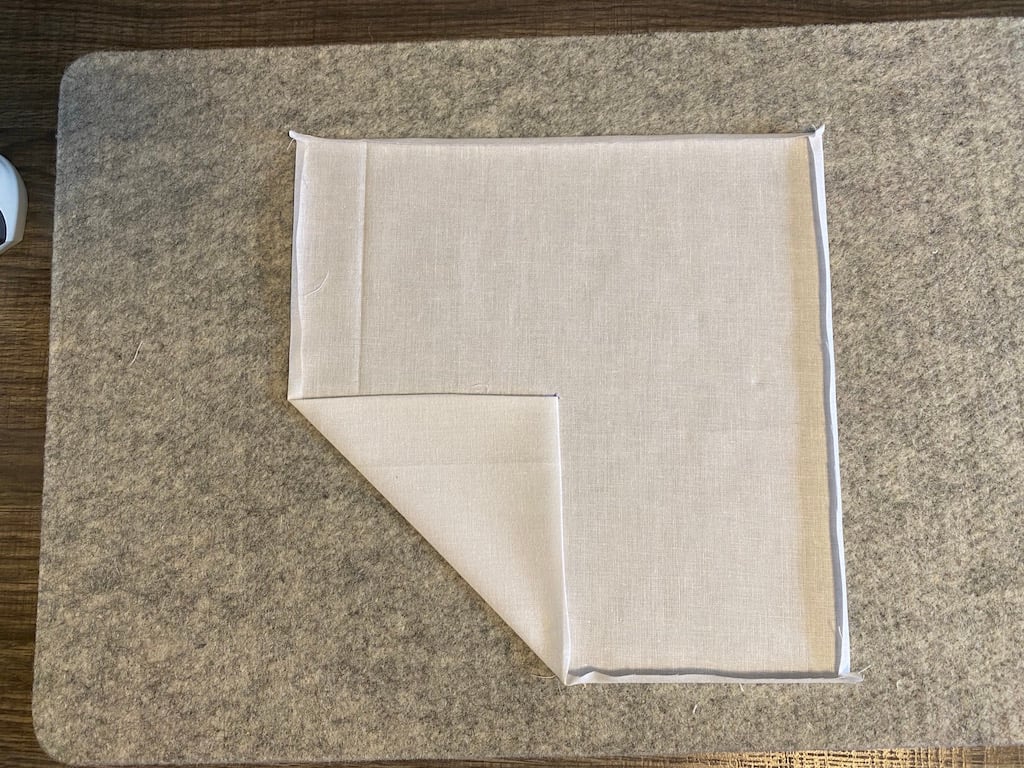
Repeat with the other three corners.

Step 4: Second set of folds.
Repeat the folding process with all four corners. The finished square will be 5".

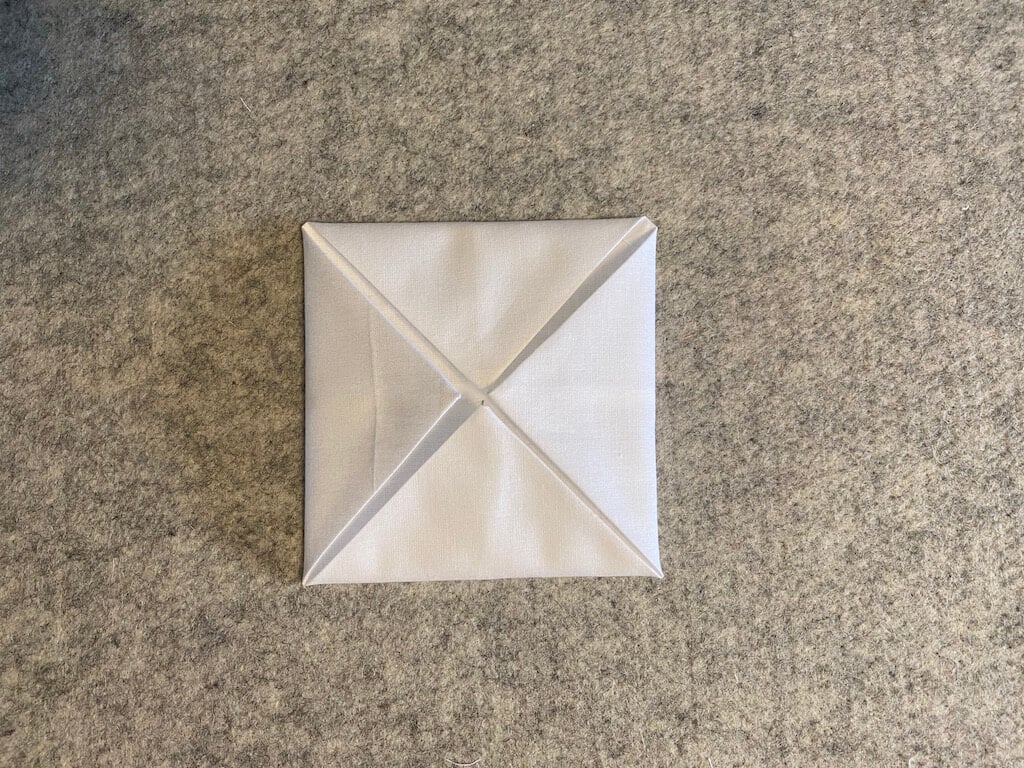
Repeat this process for the other 15 background squares.
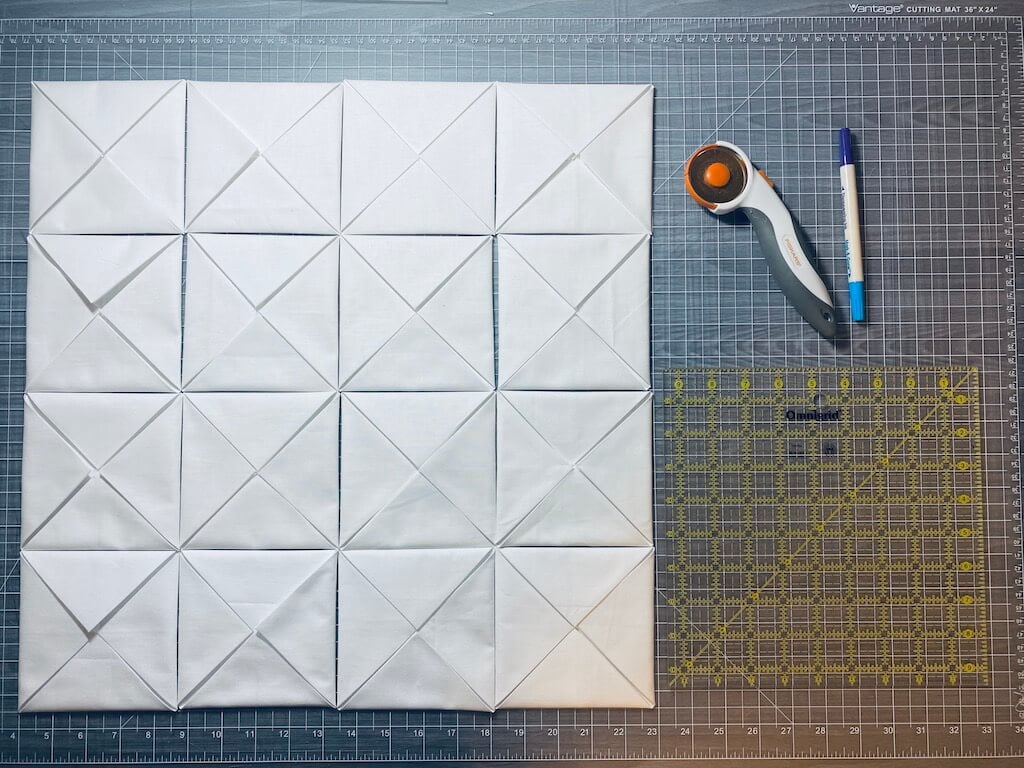
Step 5: Lay out your background squares.
Here is what your squares will look like at this point.
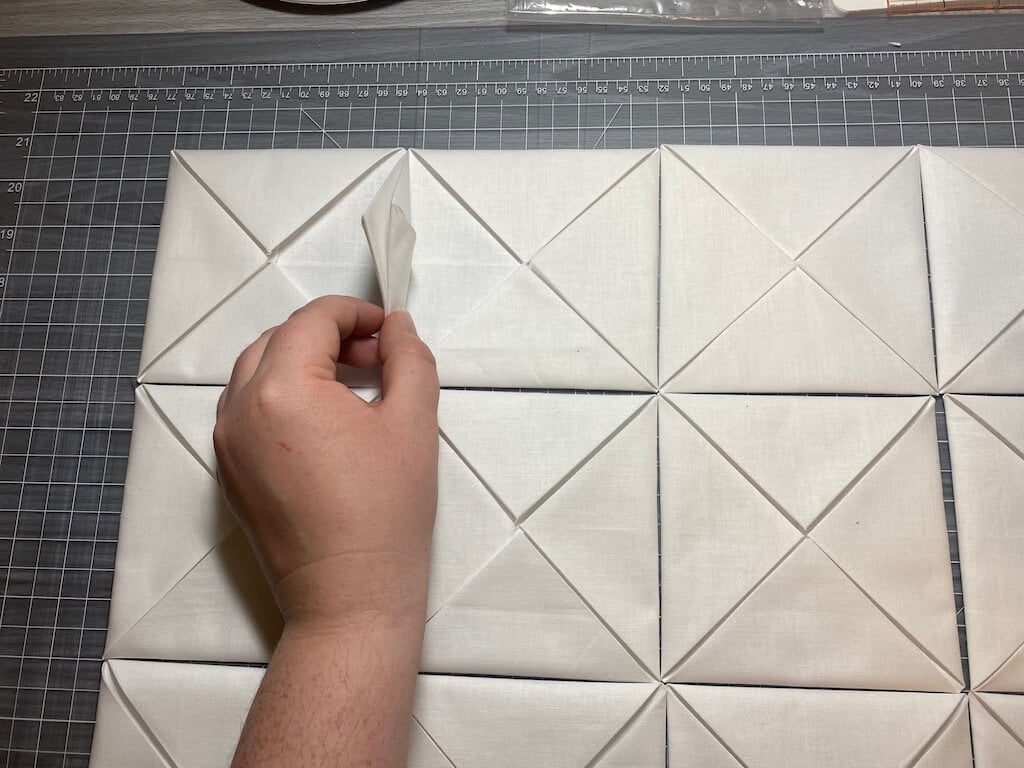
Step 6: Stitch the horizontal rows together.
Take the two flaps that are touching on your first two squares and pin them together.
Now take those two squares to your sewing machine and stitch right on the fold through both flaps.

Take the next square with the previous square, lining up the flaps and stitching down the fold. Repeat with the final square.

Repeat with the next three horizontal rows.
Step 7: Stitch the vertical rows together.
Line up the horizontal rows again. This time you are going to stitch the vertical rows together. Take the first two rows, line up the flaps that are touching and stitch the folds just like you did for the horizontal rows.

Continue by adding the next two rows, attaching them by lining up the two flaps, and stitching directly in the fold.

Step 8: Stitch a "+" at the center of each square.
This step is crucial and will help you create that "window" effect in Step 10. It also holds on the flaps in place in the center of the squares.

Step 9: Figure out the placement of the window pieces.
Place each window piece on the seams that you just created by attaching the squares. Once you've figured out the placement you want, glue down the squares. I use Elmer's glue, but you can use your preferred adhesive.

Allow the glue to completely dry before you start the next step.
Step 10: Fold the background pieces over the window pieces.
This is the final step and will take some time to finish, but it will look GORGEOUS when it's complete.
After the glue or adhesive has completely dried, you will begin folding the background pieces. This step will create a curved fold and gives the beautiful 3D look of the cathedral window block.
The curved folded edges will also conceal the raw edges of our window pieces. The background fabric will have the look of an orange peel block.

Stitch as close as you can to the edge of the background fabric, and continue stitching all around each piece until you have stitched down every curve.

More Related Articles
How To Hand-Tie A Quilt In 5 Easy Steps
A Simple Guide To Squaring Up A Quilt
How To Make a Baby Clothes Quilt: A Step-By-Step Tutorial
Yes, you can make a cathedral window quilt!
Look at that jaw-dropping mini quilt you just made! This quilt was such a fun project for me, and I know you will enjoy it too. I genuinely hope these steps and photos helped you feel more confident when you decided to try it out.
The great part about this type of quilt is it's thin since there is no batting inside, so you can use it as a coverlet or even a large wall hanging if you create a large quilt.
Mixing up the colors and fabrics will make this a truly unique project.

Source: https://quiltdom.com/cathedral-window-quilt/
Post a Comment for "Cathedral Window Using Blue Jean Fabric Cat Mat"